> ## Documentation Index
> Fetch the complete documentation index at: https://docs.backstack.io/llms.txt
> Use this file to discover all available pages before exploring further.
# Workspaces
> Organize your work with Backstack Workspaces
# Workspaces
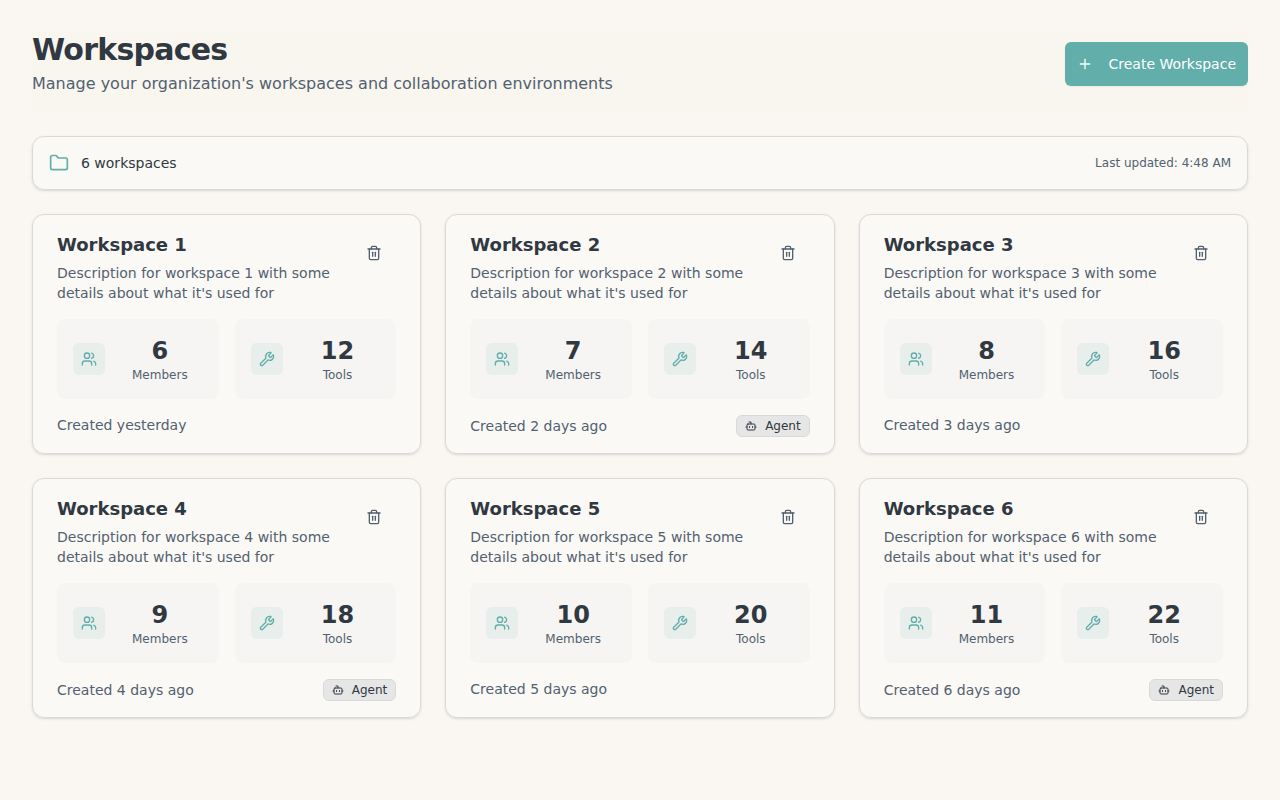
Backstack Workspaces help you organize tools, resources, and team access in logical groups.
## What are Workspaces?
A workspace is a collection of:
* **Tools** - Executable actions and integrations
* **Resources** - Data sources and context
* **Members** - Team members with specific permissions
* **Settings** - Configuration and access controls
 ## Creating a Workspace
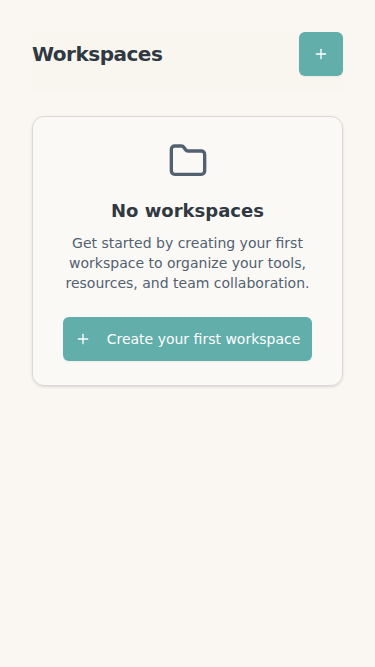
When you have no workspaces yet, you'll see an empty state with a button to create your first workspace:
## Creating a Workspace
When you have no workspaces yet, you'll see an empty state with a button to create your first workspace:
 1. Log in to [Backstack](https://app.backstack.io)
2. Click **Create Workspace**
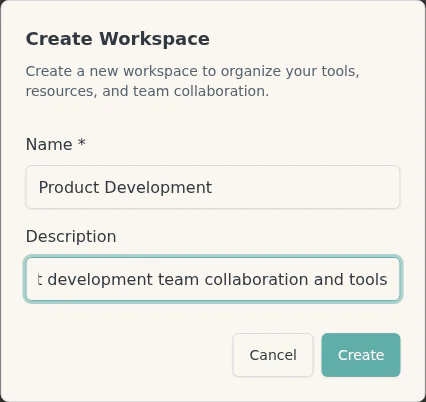
3. Enter a name and description
4. Configure visibility and permissions
5. Click **Create**
1. Log in to [Backstack](https://app.backstack.io)
2. Click **Create Workspace**
3. Enter a name and description
4. Configure visibility and permissions
5. Click **Create**
 ## Workspace Settings
### Basic Settings
**Name and Description:**
* Give your workspace a descriptive name
* Add a description to explain its purpose
* Both can be changed later in workspace settings
**Icon and Color:**
* Choose an icon to represent your workspace
* Select a color theme for easy identification
* Helps distinguish workspaces at a glance
### Visibility Levels
Control who can see and access your workspace:
| Visibility Level | Who Can See | Who Can Join | Use Cases |
| ---------------- | ------------------------ | -------------------------- | --------------------------------------------------------------- |
| **PRIVATE** | Only invited members | Invitation required | Sensitive projects, executive teams, confidential work |
| **ORGANIZATION** | All organization members | Members can request access | Department workspaces, shared resources, company-wide tools |
| **PUBLIC** | Anyone with the link | Anyone can join | Open source projects, public documentation, community resources |
**Changing Visibility:**
1. Go to workspace **Settings**
2. Select **Visibility**
3. Choose your preferred level
4. Click **Save**
Changing from PRIVATE to PUBLIC makes all workspace tools and resources accessible to anyone with the link. Review security implications before making workspaces public.
### Self-Join Permissions
Allow users to join without invitation:
**Self-Join Settings:**
* **Disabled** (default) - Admins must invite all members
* **Request to Join** - Users can request access, admins approve
* **Auto-Join** - Users can join immediately without approval
**Configuring Self-Join:**
1. Navigate to workspace **Settings**
2. Go to **Member Settings**
3. Toggle **Allow Self-Join**
4. Choose approval method
5. Save changes
Self-join with approval is useful for large teams where members frequently need access to different workspaces. It reduces admin burden while maintaining control.
### Workspace Roles and Permissions
Members can have different roles with specific permissions:
| Permission | Owner | Admin | Member | Read-Only |
| ---------------------------------- | ----- | ----- | ------ | --------- |
| View workspace tools and resources | ✅ | ✅ | ✅ | ✅ |
| Use tools in AI conversations | ✅ | ✅ | ✅ | ❌ |
| Share documents to workspace | ✅ | ✅ | ✅ | ❌ |
| Invite members | ✅ | ✅ | ❌ | ❌ |
| Modify workspace settings | ✅ | ✅ | ❌ | ❌ |
| Assign MCP servers to workspace | ✅ | ✅ | ❌ | ❌ |
| Change member roles | ✅ | ✅ | ❌ | ❌ |
| Delete workspace | ✅ | ❌ | ❌ | ❌ |
**Assigning Roles:**
1. Go to workspace **Members** tab
2. Find the member to modify
3. Click the role dropdown
4. Select new role
5. Changes apply immediately
**Role Guidelines:**
* **Owner** - Workspace creator or primary maintainer (minimum 1 required)
* **Admin** - Team leads managing workspace configuration
* **Member** - Regular users working with tools and resources
* **Read-Only** - Observers who need visibility but not execution access
### Delegation
Delegate workspace tool execution to AI agents on behalf of users:
**What is Delegation?**
* AI agents can execute tools without explicit user approval
* User delegates trust to specific AI agents
* Useful for automated workflows and background tasks
**Delegation Settings:**
1. Open workspace **Settings**
2. Go to **Delegation**
3. Toggle **Allow Agent Delegation**
4. Configure delegation rules:
* Which agents can be delegated
* What tools agents can execute
* Approval requirements
5. Save configuration
**Delegation Modes:**
* **None** - No delegation allowed, all executions require user approval
* **Limited** - Specific tools can be delegated to approved agents
* **Full** - All workspace tools can be delegated (use with caution)
Delegation is an advanced feature primarily used for automated workflows. Most workspaces don't need delegation enabled.
### Permissions
Control workspace access and capabilities:
**Tool Execution:**
* Who can execute tools in this workspace
* Read-only members can see tools but not execute them
* Execution is logged in activity logs
**Document Access:**
* Who can view shared documents
* Who can share new documents to workspace
* Document search permissions
**Member Management:**
* Who can invite new members
* Who can change member roles
* Who can remove members
**Configuration:**
* Who can modify workspace settings
* Who can assign/unassign MCP servers
* Who can delete the workspace
## Managing Members
Add team members to a workspace:
1. Open the workspace
2. Go to **Members** tab
3. Click **Add Member**
4. Select user and assign role (Owner, Admin, Member, Read-Only)
5. Click **Add**
## Workspace Settings
### Basic Settings
**Name and Description:**
* Give your workspace a descriptive name
* Add a description to explain its purpose
* Both can be changed later in workspace settings
**Icon and Color:**
* Choose an icon to represent your workspace
* Select a color theme for easy identification
* Helps distinguish workspaces at a glance
### Visibility Levels
Control who can see and access your workspace:
| Visibility Level | Who Can See | Who Can Join | Use Cases |
| ---------------- | ------------------------ | -------------------------- | --------------------------------------------------------------- |
| **PRIVATE** | Only invited members | Invitation required | Sensitive projects, executive teams, confidential work |
| **ORGANIZATION** | All organization members | Members can request access | Department workspaces, shared resources, company-wide tools |
| **PUBLIC** | Anyone with the link | Anyone can join | Open source projects, public documentation, community resources |
**Changing Visibility:**
1. Go to workspace **Settings**
2. Select **Visibility**
3. Choose your preferred level
4. Click **Save**
Changing from PRIVATE to PUBLIC makes all workspace tools and resources accessible to anyone with the link. Review security implications before making workspaces public.
### Self-Join Permissions
Allow users to join without invitation:
**Self-Join Settings:**
* **Disabled** (default) - Admins must invite all members
* **Request to Join** - Users can request access, admins approve
* **Auto-Join** - Users can join immediately without approval
**Configuring Self-Join:**
1. Navigate to workspace **Settings**
2. Go to **Member Settings**
3. Toggle **Allow Self-Join**
4. Choose approval method
5. Save changes
Self-join with approval is useful for large teams where members frequently need access to different workspaces. It reduces admin burden while maintaining control.
### Workspace Roles and Permissions
Members can have different roles with specific permissions:
| Permission | Owner | Admin | Member | Read-Only |
| ---------------------------------- | ----- | ----- | ------ | --------- |
| View workspace tools and resources | ✅ | ✅ | ✅ | ✅ |
| Use tools in AI conversations | ✅ | ✅ | ✅ | ❌ |
| Share documents to workspace | ✅ | ✅ | ✅ | ❌ |
| Invite members | ✅ | ✅ | ❌ | ❌ |
| Modify workspace settings | ✅ | ✅ | ❌ | ❌ |
| Assign MCP servers to workspace | ✅ | ✅ | ❌ | ❌ |
| Change member roles | ✅ | ✅ | ❌ | ❌ |
| Delete workspace | ✅ | ❌ | ❌ | ❌ |
**Assigning Roles:**
1. Go to workspace **Members** tab
2. Find the member to modify
3. Click the role dropdown
4. Select new role
5. Changes apply immediately
**Role Guidelines:**
* **Owner** - Workspace creator or primary maintainer (minimum 1 required)
* **Admin** - Team leads managing workspace configuration
* **Member** - Regular users working with tools and resources
* **Read-Only** - Observers who need visibility but not execution access
### Delegation
Delegate workspace tool execution to AI agents on behalf of users:
**What is Delegation?**
* AI agents can execute tools without explicit user approval
* User delegates trust to specific AI agents
* Useful for automated workflows and background tasks
**Delegation Settings:**
1. Open workspace **Settings**
2. Go to **Delegation**
3. Toggle **Allow Agent Delegation**
4. Configure delegation rules:
* Which agents can be delegated
* What tools agents can execute
* Approval requirements
5. Save configuration
**Delegation Modes:**
* **None** - No delegation allowed, all executions require user approval
* **Limited** - Specific tools can be delegated to approved agents
* **Full** - All workspace tools can be delegated (use with caution)
Delegation is an advanced feature primarily used for automated workflows. Most workspaces don't need delegation enabled.
### Permissions
Control workspace access and capabilities:
**Tool Execution:**
* Who can execute tools in this workspace
* Read-only members can see tools but not execute them
* Execution is logged in activity logs
**Document Access:**
* Who can view shared documents
* Who can share new documents to workspace
* Document search permissions
**Member Management:**
* Who can invite new members
* Who can change member roles
* Who can remove members
**Configuration:**
* Who can modify workspace settings
* Who can assign/unassign MCP servers
* Who can delete the workspace
## Managing Members
Add team members to a workspace:
1. Open the workspace
2. Go to **Members** tab
3. Click **Add Member**
4. Select user and assign role (Owner, Admin, Member, Read-Only)
5. Click **Add**
 The Add Member dialog allows you to invite users by email and assign them a role:
 **Removing Members:**
1. Go to **Members** tab
2. Find the member to remove
3. Click the remove icon
4. Confirm removal
Members lose access to workspace tools and resources immediately upon removal.
## Assigning MCP Servers
Connect organization services (MCP tools) to your workspace:
### What Server Assignment Does
When you assign an MCP server to a workspace:
* All workspace members can use that tool in AI conversations
* The tool appears in members' AI clients when the workspace is active
* Tool execution is scoped to the workspace (permissions, policies apply)
### Assigning Servers
1. Open the workspace
2. Go to **Tools** tab
3. Click **Assign MCP Server**
4. Select from organization's installed services:
* NPM packages (GitHub, Filesystem, etc.)
* Remote servers
5. Click **Assign**
The tool is immediately available to all workspace members.
### Unassigning Servers
To remove a tool from a workspace:
1. Go to **Tools** tab
2. Find the server to remove
3. Click **Unassign**
4. Confirm removal
Unassigning a server removes it from all members' AI clients for this workspace. Any conversations relying on that tool will lose access.
### Tool Visibility
Tools assigned to a workspace are visible based on workspace visibility:
* **PRIVATE workspace** - Only invited members see the tools
* **ORGANIZATION workspace** - All organization members see the tools (if they're members)
* **PUBLIC workspace** - Anyone with access sees the tools
**Best Practices:**
* Assign tools relevant to the workspace purpose
* Don't assign all tools to all workspaces (clutters AI context)
* Review tool assignments quarterly
* Remove unused tools to optimize performance
See [Organization Services](/organization-services) for installing and managing MCP servers.
## Using Workspaces with MCP
When you connect an AI client via MCP, you select an organization. The AI client will have access to all tools and resources in workspaces you're a member of within that organization.
Learn more about [MCP Setup](/mcp).
## Mobile and Responsive Access
Workspaces are accessible across all devices with a responsive interface that adapts to your screen size.
### Mobile View
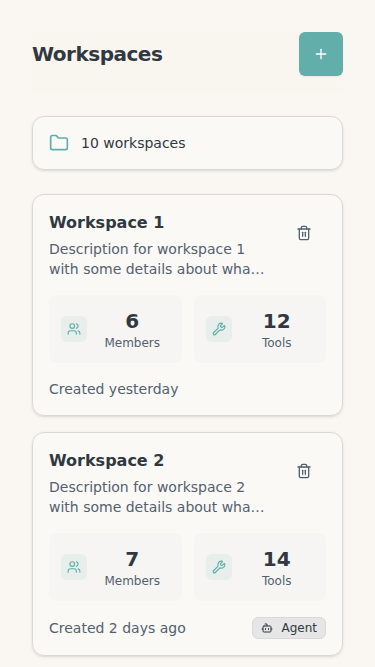
On mobile devices, workspaces display in a single-column layout for easy browsing:
**Removing Members:**
1. Go to **Members** tab
2. Find the member to remove
3. Click the remove icon
4. Confirm removal
Members lose access to workspace tools and resources immediately upon removal.
## Assigning MCP Servers
Connect organization services (MCP tools) to your workspace:
### What Server Assignment Does
When you assign an MCP server to a workspace:
* All workspace members can use that tool in AI conversations
* The tool appears in members' AI clients when the workspace is active
* Tool execution is scoped to the workspace (permissions, policies apply)
### Assigning Servers
1. Open the workspace
2. Go to **Tools** tab
3. Click **Assign MCP Server**
4. Select from organization's installed services:
* NPM packages (GitHub, Filesystem, etc.)
* Remote servers
5. Click **Assign**
The tool is immediately available to all workspace members.
### Unassigning Servers
To remove a tool from a workspace:
1. Go to **Tools** tab
2. Find the server to remove
3. Click **Unassign**
4. Confirm removal
Unassigning a server removes it from all members' AI clients for this workspace. Any conversations relying on that tool will lose access.
### Tool Visibility
Tools assigned to a workspace are visible based on workspace visibility:
* **PRIVATE workspace** - Only invited members see the tools
* **ORGANIZATION workspace** - All organization members see the tools (if they're members)
* **PUBLIC workspace** - Anyone with access sees the tools
**Best Practices:**
* Assign tools relevant to the workspace purpose
* Don't assign all tools to all workspaces (clutters AI context)
* Review tool assignments quarterly
* Remove unused tools to optimize performance
See [Organization Services](/organization-services) for installing and managing MCP servers.
## Using Workspaces with MCP
When you connect an AI client via MCP, you select an organization. The AI client will have access to all tools and resources in workspaces you're a member of within that organization.
Learn more about [MCP Setup](/mcp).
## Mobile and Responsive Access
Workspaces are accessible across all devices with a responsive interface that adapts to your screen size.
### Mobile View
On mobile devices, workspaces display in a single-column layout for easy browsing:
 ### Tablet View
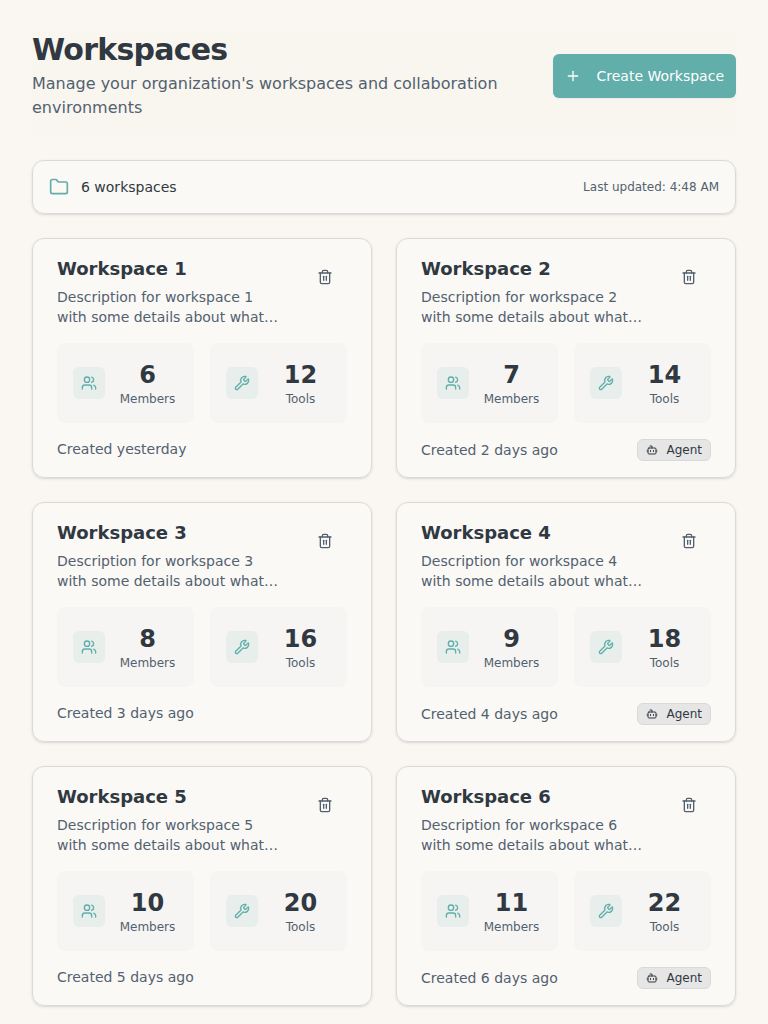
On tablets, workspaces display in a two-column grid that balances information density with touch-friendly interface:
### Tablet View
On tablets, workspaces display in a two-column grid that balances information density with touch-friendly interface:
 ## Next Steps
* [Set up MCP clients](/mcp) to access your workspace tools
* Explore available tools and resources
* Invite team members to collaborate
## Next Steps
* [Set up MCP clients](/mcp) to access your workspace tools
* Explore available tools and resources
* Invite team members to collaborate